
Old-School Porsche Knowledge, Modern Workshop Standards: Inside Goss Hall Werks
Every Porsche specialist has its own character. Some are built around race cars. Some focus heavily on restoration. Others are

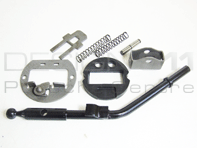
Installing the 911 Short Shift Kit
Following are detailed instructions on installing a Short Shift into a 1978 911SC. They should be applicable for model years 1974 to 86.
Parts Involved:
Things the Short Shift kit includes:
1.Shift lever (longer below the pivot, slightly shorter above it) 2.Metal top plate 3.Rubber buffer plate 4.(2) Springs 5.Spring guide plate 6.Pivot cage 7.Pivot pin
Things you WILL also need:
1. New “crush sleeve” to fit shift knob on new lever
Things you MAY also need:
1.Bushings a.Shift lever ball end bushing b.Shift rod front pivot bushing c.Bushings for shift coupler 2.Shift knob
Note: Shift coupler can be easily inspected before you order anything. You may want to order the other bushings in case you find out the old bushings are bad once you have the shift tower apart.
Tools needed:
5mm, 6mm allen wrenches (for shift tower bolts)
10mm wrench (for shift tower top plate nuts)
22mm socket (for late-style shift tower locknut)
(2) 13mm wrenches (to adjust shift coupler, can also use 13mm wrench and a low profile 13mm socket)
Needle-nose pliers (for lockrings)
Grease (for everything)
Beer comes in handy too, particularly in the adjustment phase.
Step-by-step instructions:
1. Remove center console if you have one. 4 screws around the perimeter of the back cover piece (where it joins the main console piece), pull off cover piece, then 2 screws holding down the back of the console and one (under the carpet) holding down the front. The front screw can be tricky because the parking brake handle will be in the way.
2. Remove old shift knob. If this looks to be difficult you might be wise to order a new one to keep handy & return if you don’t need it. You will need a new “crush sleeve” (interference fit sleeve) either way since you’ll probably mangle the old one getting the knob off.
You can probably avoid the breaking of the shift knob by waiting until after step 13, given that you have a vice in which to hold the old lever whilst you tap the knob gently off. You could also use a gear puller with a bit of wood or something under the center “push” part to prevent damage to the knob, but likely a soft faced hammer or a bit of wood used as a buffer will do the trick.
3. Remove shifter boot.
4. The “late-style” (don’t know exactly how late) shift tower has a locknut and allen bolt that position the forward end of the longitudinal pivot axis. If you have this type of tower, use a 22mm socket to loosen the locknut BEFORE you remove the tower from the car. I had to reinstall my (empty) shift tower just to get enough leverage to crack the nut loose.
5. Apply the parking brake and shift into neutral. This will allow you to pivot the shift rod side-to-side as needed to reinstall the shifter later.
6. Remove the 3 big Allen-head screws (6mm wrench) that hold the shift tower to the car – two on the front side of the plate, one on the back. At this point the tower should be loose, though it won’t come off yet since it’s still attached to the bracket that holds the front bushing for the shift rod.
7. Remove the 2 smaller Allen-head screws (5mm wrench) that hold this bracket to the shift tower.
8. At this point you should be able to lift the tower and shifter free of the shift rod. The end of the shift lever is press-fit inside a rubber bushing that fits inside a cup on the shift rod. You may need to tug a bit, but the bushing should pop out eventually.
9. Take the shift tower to a workbench to work on it, since it’s got some small pieces you don’t want to lose.
10. Remove and save the two 10mm nuts and lock washers that hold the plate to the top of the shift tower. There are 2 strong springs inside this plate, on the left (1st/2nd gear) side. If you have a vice or large C-clamps, you might want to clamp the plate before you remove the nuts. If not, loosen the nuts first and then maintain pressure on the plate as you remove them by hand. This keeps the assembly from “exploding” – although you won’t need to keep the springs anyway so it’s no great loss if they wander off.
11. Remove the top plate, springs, the rubber buffer pad (shaped the same as the plate & directly beneath it), and the piece the springs run on, and set them aside. The new kit has replacements for all of these.
12. Looking down inside what’s left of the shift tower, you’ll see the pivot cage that attaches the shift lever to the tower. This cage has a pin running laterally (side-to-side) on which the shift lever pivots for fore-and-aft movement (i.e. 1 to 2, 3 to 4), while the cage itself can tilt relative to the tower to give side-to-side lever movement. Remove AND SAVE the two lockrings (C-rings) that hold the lateral axis (side-to-side-running) pivot pin in place, one on either side of the cage. Remove this pivot pin and set it aside.
13. Pull the shift lever free of the pivot cage.
14. Remove the pivot cage from the shift tower. On the late-style tower, you unthread the allen bolt that forms the front longitudinal (fore-and-aft running) pivot, then press out the interference-fit piece for the rear pivot. I suspect an early tower would just have the interference-fit pieces on both ends. To press out the pivot, I slid a breaker bar through the pivot cage, placed its flat edge against the pivot, then grabbed both ends and squeezed against the top and bottom ends of the shift tower. This just pushes the pivot back enough that you can get the cage out.
15. Set aside the pivot cage. Keep the allen bolt and/or pivot piece(s) and the washer(s).
16. Clean up the bits you’ll be reusing: lock rings, cage pivot piece(s), cage pivot washer(s), shift tower, 10mm nuts and lock washers.
17. Cut the bottom end off the bag that the shift lever’s in. Try to leave this bag over the top end of the shift lever until you have installed it in the tower; this reduces the chances of scratching the paint.
18. Check the fit of the new shift lever in the new pivot cage. I had to bend the cage walls out a bit and file the edges a little to get it to fit.
19. Grease the pivot end of the shift lever and the pivot pin, then assemble the lever to the pivot cage and replace the lock rings. With the shift lever positioned so it bends toward you, the pivot pin should extend out of the left side of the cage so it can engage the spring guide plate once the pivot is installed in the tower. A good grease for this is Dow 111 silicone, non staining and won’t drip off in hot weather, plus it doesn’t smell.
20. Grease the cage’s fore and aft pivot points (holes) and install the cage and lever into the tower. If you have the late-style tower, replace the allen bolt and lock ring and adjust so the pivot cage has no fore-and-aft play. For those who do not have the adjustable pivot, it is well worth getting an old housing or even a new one if you can justify the expense. The housing was changed in 1977 so all SC’s have it. On adjustment, one trick is to not tighten the lock nut too tightly, but rather leave it snug until you find the right tension for you. BTW, it never has to be too tight, as it doesn’t get much stress.
21. Grease and install: new spring plate, new springs, rubber buffer plate, metal top plate, 10mm lock washers and nuts. A vice or an extra set of hands would be helpful in mounting the metal top plate, since you need to compress the springs while lining the plate up to (a) the studs for the 10mm nuts and (b) the two tabs of the metal plate on which the springs run. It can be done solo, but it’s not particularly fun and you’ll need to curse a bit.
22. Clean and grease the inside of the shift lever bushing (if you’re reusing it) and press it onto the ball end of the shift lever.
23. Return the tower to the car. Locate the bracket that holds the bushing in which the front end of the shift rod pivots. Clean and re-grease the shift rod where it runs in this bushing. Position the bracket so its tab (with the threaded holes) sits ABOVE the tunnel. The big, non-threaded hole should line up with the threaded hole in the tunnel (where the big Allen bolt goes)
24. Clean and re-grease the cup at the front of the shift rod that the shifter bushing fits into.
25. Lower the tower into place and fit the shift rod bushing into the cup. This takes some finesse and luck. It seems to work best with the shift rod held vertical. If you have small, long fingers, you can reach in through the access hole in the side of the tower to help fit the bushing into the cup. It should slide easily to the bottom.
26. Line up the holes that mount the shift rod bracket to the plate and reinstall these bolts.
27. Line up the holes that mount the plate to the tunnel and reinstall these bolts. Make sure that you have the shift lever in the cup at this point.
28. Reinstall the shift boot and knob, using a new “crush ring” for the knob.
29. See if you can get into any gears. If you can’t, don’t despair, we still have to adjust the shift linkage. But, it’s helpful to figure out how “close” you are. Return to neutral.
30. The cover for the shift linkage is on the tunnel just forward of the rear “seats.” Pull up the carpet, remove 4 screws and take off the cover.
31. There should be a rubber boot covering the shift linkage.
32. Loosen the clamp holding the shift rod to the coupling.
33. The Haynes manual recommends the following procedure for adjusting the linkage:
a. Pivot the coupler so it’s in the 1/2 plane. Facing the rear of the car, this is the counter-clockwise limit. b. Position the shift lever against the left-hand stop and move it so the lower part is vertical. c. Tighten the clamp and check the adjustment.
34. You may need to fine-tune this adjustment a bit to easily get into all the gears. Once you can see the coupler move as you move the lever, it should be obvious what you need to do.
35. As a final check, shift into 5th gear and make sure there is some fore-and-aft play in the coupler and linkage. There won’t be any play in 1st or 3rd; this is normal.
You must be able to get into reverse without grinding, and when you have selected 5th, you should be able to move the coupler between the rear seats slightly, otherwise things are too tight. Not much, but just a bit of rotational “wiggle” is necessary.
34. Button it up and go for a test drive.
To buy this product Click Here
�
Every Porsche specialist has its own character. Some are built around race cars. Some focus heavily on restoration. Others are

Some Porsche stories are about horsepower, lap times or rare specifications. Anil’s story is different. His Porsche 968 is not

Design911 is pleased to announce a new partnership with Rennen Plus. A new range of Rennen Plus Porsche performance parts

In this episode of the Pork Life Podcast, we sit down with Race&Taylor and Jas MB for a relaxed conversation