
Old-School Porsche Knowledge, Modern Workshop Standards: Inside Goss Hall Werks
Every Porsche specialist has its own character. Some are built around race cars. Some focus heavily on restoration. Others are

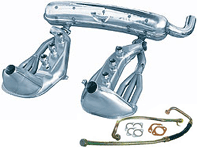
Early Heat Exchanger Retrofit.
The car used for this upgrade is a 1982 911SC. This upgrade is one of the best bolt on improvements that can be done to 911’s 1974-89 2.7L / 3.0L and 3.2L.
The results of upgrade.
Increase in horsepower. There have been claims of anywhere from 10-30 horsepower. There is definitely an increase especially in the higher RPMs. A rough guesstimate would be teens to twenty. Flatter torque curve. The torque begins earlier, and is smoothed out throughout the RPM range. The SC lost some of the head jerking mid-range torqueiness, but there is now a smoother pull through all RPM The clutch chatter went away. Increased torque and also the car no longer backfires, and it also does not smoke.
Part that you need: Either pre-1974 Heat Exchangers or early design Heat Exchangers made by Dansk, 2 oil lines. One has a rubber section, the other is all metal A 2-in muffler and muffler straps 2 neoprene heater hoses (10″ or 12″) 6 8mm barrel nuts 6 12mm locking hex nuts 6 exhaust gaskets (I used the asbestos with metal ring type, but the copper with asbestos sandwiched is supposed to be just as good if not better) 2 copper muffler gaskets.
You can buy this set by clicking here
Tools that you need: Metric Socket Set with extensions Metric Hex Socket Set Car jack Jack stands Flat screwdriver ¼” Drive extension 13mm universal joint socket – For these universal sockets get the ones that are already u-jointed not a socket attached to a u-joint. THIS WILL NOT WORK – Also for these sockets, get ones that are ¼” drive the small size of the socket itself helps with tight spaces 12mm universal joint socket 13mm and 12mm Crows foot sockets 8mm allen wrench Anti-seize Penetrating oil LARGE adjustable wrench (Channel-Lock) – Or Porsche oil line wrenches – Needs to be 32mm Crescent wrench – Up to 300mm New oil Oil catch pan (i.e. turkey roasting pans) 12 and 13mm open end wrenches Propane torch Oxygen-MAAP gas torch Water squirt bottle Latex gloves. Towels Naval Jelly Rust Remover and wire brush – If you are restoring old Heat Exchangers LOTS OF PATIENCE
Preparation.
So to start engage parking brake, chock front wheels , lift car and place on jack stands.. Place jack stands under rear torsion bar covers with a piece of carpet or padding to prevent damage.. MAKE SURE IT IS SECURE BEFORE SLIDING YOUR HEAD UNDER 2700 POUNDS OF METAL. Take off both rear wheels. Try to soak all nuts and bolts: muffler strap allen nuts (2); pre-muffler nuts (3); heat exchangers (6); heads-heat exchangers (6 barrel, 6 hex) with plenty of penetrating oil. Do this 3 or 4 times a day for a week if possible. It may be good to soak the two oil lines coming out of the thermostat towards the back of the car. Of these two, follow the one which is behind the other till you get to another junction of oil lines, and you may want to use penetrating oil here too.
Disassembly
Loosen pre-muffler nuts (13mm). Then loosen muffler strap allen nuts). Remove muffler. Remove six nuts holding pre-muffler to the driver side (DS) heat exchanger (HE) and the cross over pipes from the passenger side (PS) HE (13mm). You may want to use heat. Either the propane or the Oxy-Maap torch. There are a few that are in tight spaces so use the crow foot, u-joint or open end wrenches. You will have to counter hold one side. First turn the bolt till you hear the rust squeak (this will be important later) then counter hold and break the rust between the nut and the bolt.. Now remove your pre-muffler.
While doing this disassembly you should be spraying penetrating oil on the heads-heat exchanger nuts.
If you want you can disassemble the crossover pipes from the PS HE,
Removal of the Heat Exchangers.
There are some horror stories about the exhaust studs breaking. And this is what you want to avoid. Keep telling yourself you will be patient. The advice has been to heat/cool the nuts about four times before any attempts of removal. I would stress this for those of you living in rust inducing areas. I on the other hand gave each nut a very light try. And 2 hex nuts came off. Saved me a little time. Then I heated/cooled then tried the nut lightly (a bit harder then before). And if it was unsuccessful I tried again. Also remember to try to tighten before loosening. The key is to either feel the nut turn when tightening, or to hear the rust squeak. Those are the ONLY 2 situations when you should attempt to remove the nut. If you do not feel either you must continue the heat/cool cycle. Also after loosening the nut, spray some penetrating lube as you loosen the nut, thus lubricating the stud. You will notice the nuts are in extremely tight spaces and you will need to use a combination of the socket extensions, u-jointed 13mm socket, 13mm crow foot, 13mm open ended wrench to get to the nuts. On some, the u-joint would work well until the nut backs down and makes the space tighter, then I would have to switch to the crow foot as the nut came down. Make sure the socket or wrench is seated completely. Because you are working at angles, you DO NOT want to round the nut. Or else you will be in a very sorry position. For the barrel allen nuts, I used a 8mm T-handle allen wrench. Insert it through the holes in the HE’s and again make sure they are fully seated or you risk rounding the nut! The T-handle gave me 2 places to place my hands so I did not risk pulling with the allen at an angle that could happen when loosening with a socket wrench. Also I think this 2 handed method gives a more sensitive touch when trying to tighten nuts to test for loosened rust. Disconnect the heater hoses in the front, and back of the heat exchangers. I forgot to and they ripped as I undid the last nut on the heat exchangers. My paper ones on the front had seen better days so I replaced both with neoprene hoses. The black ones with the wire embedded in the outer cover is convenient because you can trim the length of the hoses without seeing it unravel and make a mess. On the passenger side back, there is a long tube of flexible hose, connected to an elbow, then to the heat exchanger. Take off the elbow and put aside, but keep the flexible hose. On the driver’s side, there is a smaller length of tube, then an elbow. Take off both the elbow and the tube, set aside the elbow, and we will have to make modifications to this length of hose. It is very
stiff aluminium tubing.
To take off the nuts you will need the oxygen-MAPP gas torch. A propane torch will not get the nuts hot enough, no longer you heat…trust me I tried. So heat each nut till bright red. I even turned off my work light, and heated the nuts, and would check by removing the torch for a second to see if the nut was indeed glowing. For some nuts it will be impossible but try to heat all around the nut perpendicular to the exhaust stud, heating just the nut. Once it is bright red, give it a good long squirt with water. Watch out, the dripping water is HOT. As well as all metal parts within 6 inches of the nut. My engine was very oily and I was worried that I would start some fires…and I did. But they were very small, and I could just let it burn or blow them out. But it may be prudent to have an extinguisher on hand. The heat method is essential, and getting them cherry red is also essential. Remember patience. Nuts I could not get off with 15 minutes of propane came off with the oxygen-MAPP gas torch. Some nuts needed 1 cycle, others needed 3. So for each nut tighten and listen for the squeak. For some nuts I used more force then I was comfortable, in fear of breaking the studs, but if you heated multiple times, there is nothing more you can do. The stud will either break or the nut will give. Don’t use full force till heating at least 4 times. After that just give it a go and hope for the best. For some nuts if there was no squeak I just semi-lightly tightened and loosened trying to “rock” the nut back and forth. And then continued the heat cycle. Some people suggest rapping the nut to help loosen the rust. But I did not in fear of breaking the stud. If a nut is stubborn, spray penetrating oil on it and move to another. Do not dwell on one or you will break it. Also when you get to the last couple on one HE, support the HE with a jack (padded with a 2´4 or a paperback book). This will keep from all the force being on one nut. And save the HE falling on your face. If you were lucky like me none broke and you sigh a HUGE sigh of relief. But for those of you in the rusty regions of the world, breaking one or two is inevitable. Check the forum for suggestions. Some suggest welding on a nut and turning the stud out. Or you can use the 2 nut method. Thread two nuts on, and tighten one onto the other, thus locking them and then turn the stud out. You can drill them out. Some members even had special jigs made to drill out the offending stud. And others used Snap-On tools that assist removing broken studs. I have no experience with this, so check with the BBS.
Take a break. The worst is over…but the second worst part is next. (oh and reward yourself by starting up the engine with no exhaust system whatsoever! The sound is incredible, especially if you rev it. And if you look under the car, you will see flames shooting out too…)
This maybe a good time to check for oil leaks in the oil cooler (fixed by 3 simple o-rings) and also to clean off the oil crud that has built up for years. I used 3 cans of brake cleaner and a wire brush and clean off an inch think layer of crud. This improved my shifting because it cleared up some crud from linkages and moving parts near the clutch helper spring.
Oil Lines.
Okay, now it is time to tackle the oil lines. The oil line in question begins at the oil thermostat. If you remove the passenger rear wheel, you will see the thermostat and 2 oils lines. You will have to remove the on in front of the other, because the one we are interested in is the one in back. This oil line goes towards the rear of the car, turns into a flexible section, bends and follows the rear of the engine crossing over to the drivers side, then turns to the front and plugs into the crankcase on the driver’s side of the engine. After the flexible section it is bolted to the engine for support, as well as in the wheel well, supporting both oil line coming out of the thermostat. The new oil line is made up of one piece with a flexible section that will attach to the thermostat, then it will connect to an all metal oil line, cross over to the driver’s side on the FRONT of the engine, and then plug into the crankcase.
First thing is to drain the oil. Because my car was on jacks getting penetrating oil I could not warm the engine, but it was still okay. Just drain at both the oil tank and the sump cover. Then replace the plugs because the oil will keep dripping out while you work on the oil lines.
If you check the there are many horror stories at the thermostat too. Because the thermostat is aluminium and the oil lines are steel, if the nut is seized on, the threads on the thermostat are prone to breaking off with the oil line. Some people have just used a cutting wheel to cut through the nut and then break it off, since it is just a compression fitting. Check the bulletin board for more detailed procedure. The Bentley Manual says to heat the nuts which I did with both propane and the oxygen-MAAP gas torch. But in the end I just used brute strength. The nuts are 32mm, so I used a large pair of channel lock pliers. I actually braced the thermostat with my toes on the lines coming out from the bottom of the thermostat, and twisted. Careful, I smashed my finger against the inside fender but both came off, no breakage.
If you plan never to use the oil lines again, the cracking the nut way may be the safest, but I have California emission laws to worry about. Also it is a good idea to have a catch pan here because of residual oil in the lines. But the jack stand may get in the way. So it may be good to put some plastic and newspaper under the passenger rear jack stand way in the beginning of the project. Also disconnect the oil support bracket in the wheel well. Save the rubber because you do not want the support to rub the oil lines and crack them. Once you get both nuts off follow the rear to the rear of the engine and take off the support nut. You can also disconnect the first piece from the second by using the channel lock pliers and counter holding the nut, but I left it in one piece. I then followed the oil line to the side of the crankcase and removed it there. Again have a catch pan ready. Now the oil line if off. You may want to drain it, and plug the ends before anything contaminates it. Now just plug in the first new oil line, with the flexible section. Bend that down and you will see a support bracket and a hole in the front of the crankcase to support the oil line. Then connect the all metal oil line, bring it around to the driver’s side and then connect there. Voila…you are done, fill it back up with oil and start is up again and listen to the flat six!
(Note: found some leaks in the junctions of these oil lines @ 2 weeks post-op, be sure to tighten well)
HEATER HOSES
If you are keeping your heating system, you should check conditions of your forward hoses (going into the cabin) and change if necessary. On one of the side (not sure which since it has been a while) the heat exchanger flange is very close to the inlet into the cabin, and the hose will need to be cut or else it will be crushed if you try to use the full length. I suggest trial fitting the hoses, and then attaching them at the cabin inlets end first, and only. Then move to the back of the car, to the hoses coming from the engine bay. On the passenger side you do not need to make any modifications just take the elbows used for the stock HE’s off from both diver’s and passenger’s side. Attach the hose to the end of the new HE and let it dangle. On the driver’s side you will have to remove the silver hose from the engine compartment and using a hacksaw cut it in half. Eyeball the length by putting the HE in place. It will be a tight bend for the hose but it can be done. So at this point you have 2 hoses hanging at the front of the car, and two HE’s hanging off their respective rear hoses.
INSTALLATION OF HEAT EXCHANGERS
Working on either side, put the gaskets on the head studs. Some people have used peanut butter to hold it in place; others curve the gasket to keep them in place. I curved the gaskets and they still fell, just angle them so they do not fall off, it is frustrating to keep them all on. The fit the HE into place making sure the gaskets are in place. Do not use gasket sealer, it just creates a mess by turning into a hard irremovable mess. I suggest you start from the middle barrel nut to hold the HE. Just put it on with a couple of turns to hold it in place. Now is a good time to place or attach the front heater hose to the HE. If you tighten all the way the HE all the way up there may not be enough clearance between the two to get the hose on the HE. Then start putting on the other 2 barrel nuts and locking nuts. I would put the “spacer” hex nut on the stud (not screwed on because the nut should be bigger then the stud) and hope the threads hold that in place. Then stack the appropriate nut with a locking washer, with some antiseize goop in between. Then screw the nut on. Use the same method for the barrel nuts. There may be some resistance for the HE to fit flush to the heads and that maybe the aluminium heater hoses at the back of the HE’s. Either they were cut too long or short, but I did have to force my HEs some to get the aluminium hose to bend appropriately. Tighten the best you can. Be sure to use a lot of antiseize. You remember how hard it was to get the nuts off. Torque the ones you can (18 ft-lbs) there will be a couple locking nuts on the passenger side that are impossible to torque, but do the best you can.
Double check all the connections, from the heater hoses to the cabin, the HE to heads, and the heater hoses to the engine compartment.
Every Porsche specialist has its own character. Some are built around race cars. Some focus heavily on restoration. Others are
Some Porsche stories are about horsepower, lap times or rare specifications. Anil’s story is different. His Porsche 968 is not

Design911 is pleased to announce a new partnership with Rennen Plus. A new range of Rennen Plus Porsche performance parts

In this episode of the Pork Life Podcast, we sit down with Race&Taylor and Jas MB for a relaxed conversation